Maybe you have decided to up the level of content of your blog to include pictures. What better way to do so than with a digital camera. Digital cameras are great. You can take as many pictures as you want, without development costs, you don't need a scanner, and you get your photo instantly.
Here is what I look for in a camera:
Pixels - Usually this will be around the lens area. I usually go mid-range, not the highest, because the camera will be more expensive, but I don't want the lowest either. Just remember, the more pixels you have, the better the picture will be.
Comfort - Look for a camera that is comfortable to you. Try to find a salesperson who will cover the options with you, and definately don't impulse buy on a product like this.
Ease of Setup - I don't worry about this step too much, because I am technically minded, and also, I am married to Mr. Technical. Trust me, if I can't get it, Mr. Technical can! However, if you don't have a Mr. Technical in your home, ask how easy it is to set up the camera. Also ask if your model has a docking station. This most likely will make life even easier for you.
Video - Sometimes it is fun to be able to do little video clips. If this is a feature you want, many point and shoot cameras include it.
Of course, it doesn't hurt to bring a technical friend with you, if you have someone.
Showing posts with label Pictures. Show all posts
Showing posts with label Pictures. Show all posts
Thursday, January 25, 2007

Thursday, July 06, 2006
How to Add an Avatar, Part I
I made an avatar. It is sized right, but how to associate it or link to the blog. And can you just use an avatar in comments without linking to the blog? - Rosie
There are two ways to add an avatar. One way to do so is through blogger directly, and the second way is using an off site host. For this post, we will cover the blogger way.
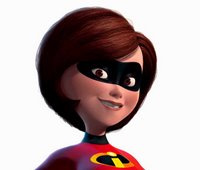
Create a new post in blogger. Upload the picture that you will want to use for your avatar. For our example, we will use my avatar, Elastigirl.
Once you have uploaded your avatar of choice, you will need to go to the Edit Html tab in the upper right corner of the screen.
Instead of the nice picture format, see a bit of confusing code. This is how blogger understand how you want your picture. You will only need to find a little bit of this code.
The code you need is always between the two quotation marks. You can select the text and right click to copy, or select the text and hit Ctrl+C to copy. (Note that you do not need to hit the + key. The + is used to indicate that you hit the two keys together.) Next, you will want to save your post as a draft. Mostly, this is to refer back if you happen to lose the bit of code you need. Next go to your dashboard and click on Edit Profile. (An alternate is to open a new window in your browser by hitting Ctrl+N and opening your Blogger dashboard.)
Next scroll down your profile until you see Photograph. If you have never done an avatar before, there should be nothing there. If a friend has helped you put up a picture, and you want to find a new one, the old picture will be there. Click on Photo Url and paste in the bit of code we copied by hitting Ctrl+V or right clicking and then clicking paste.
Next, you will scroll to the bottom and hit the Save Profile button. You should now have a profile picture for your blog.
There are two ways to add an avatar. One way to do so is through blogger directly, and the second way is using an off site host. For this post, we will cover the blogger way.
Create a new post in blogger. Upload the picture that you will want to use for your avatar. For our example, we will use my avatar, Elastigirl.

Once you have uploaded your avatar of choice, you will need to go to the Edit Html tab in the upper right corner of the screen.

Instead of the nice picture format, see a bit of confusing code. This is how blogger understand how you want your picture. You will only need to find a little bit of this code.
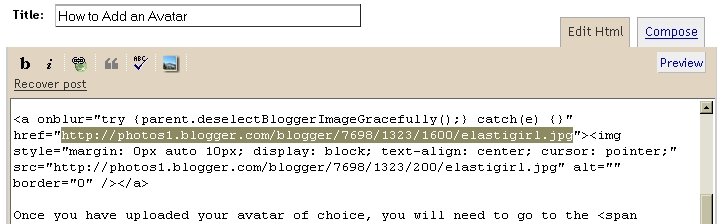
The code you need is always between the two quotation marks. You can select the text and right click to copy, or select the text and hit Ctrl+C to copy. (Note that you do not need to hit the + key. The + is used to indicate that you hit the two keys together.) Next, you will want to save your post as a draft. Mostly, this is to refer back if you happen to lose the bit of code you need. Next go to your dashboard and click on Edit Profile. (An alternate is to open a new window in your browser by hitting Ctrl+N and opening your Blogger dashboard.)

Next scroll down your profile until you see Photograph. If you have never done an avatar before, there should be nothing there. If a friend has helped you put up a picture, and you want to find a new one, the old picture will be there. Click on Photo Url and paste in the bit of code we copied by hitting Ctrl+V or right clicking and then clicking paste.
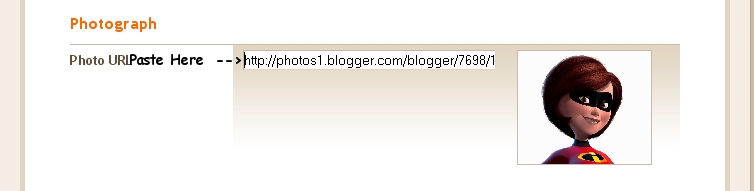
Next, you will scroll to the bottom and hit the Save Profile button. You should now have a profile picture for your blog.
Friday, March 10, 2006
How Do I Post a Picture?
Perhaps you have been interested in loading a picture, but you aren't quite sure how to do so. After all, those pretty colors and symbols above the text box you are typing in have no meaning for you. You know you are technically challenged, and you are proud of it!
However, you don't want to seem ignorant and ask. What if the person scoffs at you and says, "Dude, it is so easy!" Well, that is why this guide is here! We will help you through your picture crisis!
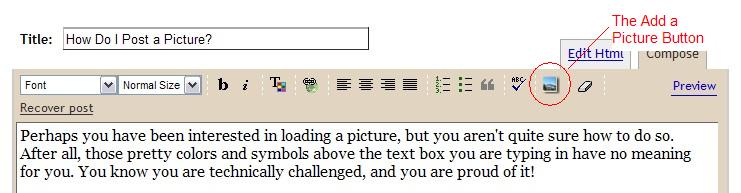
The first step is to find the pretty blue square on the toolbar above the text box you type in. You can click the picture if you need a larger view. Hit the back button to return to this blog.
However, you don't want to seem ignorant and ask. What if the person scoffs at you and says, "Dude, it is so easy!" Well, that is why this guide is here! We will help you through your picture crisis!
The first step is to find the pretty blue square on the toolbar above the text box you type in. You can click the picture if you need a larger view. Hit the back button to return to this blog.
After you click the blue button, a box will pop up in a separate window.
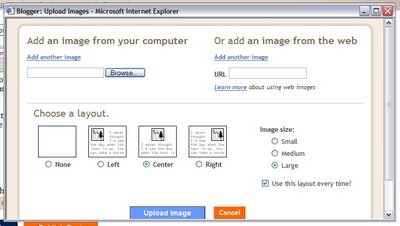
 We are going to assume you know where to find your pictures on your computer. If you don't, you may have to call the neighbor kid and ask him to show you. The reason for this is that each computer is different.
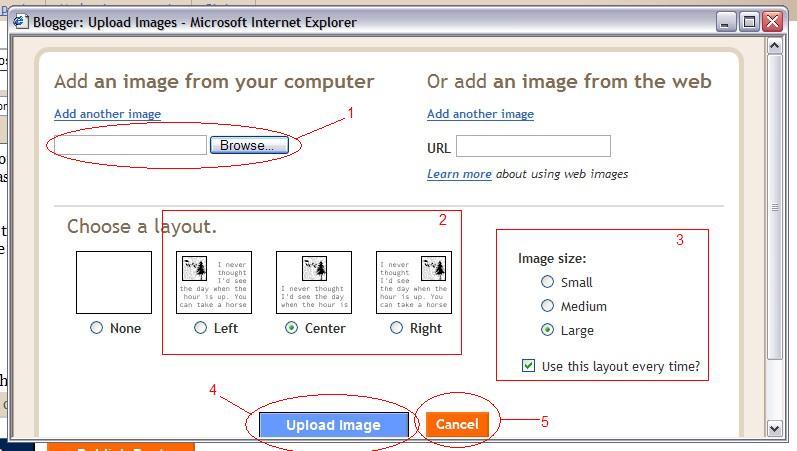
- The file bar and browse button: So, maybe you know exactly where your picture is. Well, you have the option of typing it in, of course. But most people choose to click the browse button. With the browse button, your My Documents folder will typically pop up. Find the folder you keep your pictures in. In many cases, this is the My Pictures folder. Choose the picture that you want to upload. Then go to Step 2.
- Chooose where you want your picture to be on the blog. If you are really technically challeged and want things to look pretty, I recommend center. However, you can also choose left or right for your picture, and then the text will apppear next to the photo. It is up to you.
- Choose how you want your picture to look. In most cases, people visiting your site will be able to click on the picture to enlarge it. I recommend medium or large though, because I don't want to have to pull out my glasses to see a picture either. If you like your pictures to always be Medium and Center, you can choose to put a check in the Use this layout every time box.
- Upload Image does just that. When you are done choosing your options, click Upload Image. A box will appear telling you that it is uploading the image from your computer. Sit back and take a sip of coffee. When Blogger is done, you will see a box with a blue DONE button. Click this button and your image will appear in blogger.
- The Cancel button is for anytime until the upload process. Maybe you realized Aunt Ida might not appreciate having a picture of Uncle Earl wearing lipstick posted all over the web. Hit Cancel and no one will be the wiser that you tried to upload that incriminating picture of Uncle Earl.
Subscribe to:
Posts (Atom)